logo

Learn Autodesk Fusion 360 in 30 Days for Complete Beginners! 2026 EDITION

Thumbnail
Don't open Fusion 360 until you learn these 8 terms
52K views • 2 months ago
Get the Written Instructional Guides (Bundle): https://bit.ly/guideBundle Welcome to the course: Learn Autodesk Fusion in 30 Days (2026 EDITION)! Stop feeling overwhelmed and start creating. In this lesson, we break down the 9 essential UI sections and 8 must-know terms to kickstart your 3D modeling journey. Whether you’re here for 3D printing, woodworking, or engineering, this is your foundation. SUPPORT KEVIN'S MISSION (Making CAD education accessible) Patreon: https://patreon.com/productdesignonline Buy Kevin a Coffee: https://www.buymeacoffee.com/pdo OFFICIAL 30 DAYS PLAYLIST (2026 EDITION) https://bit.ly/30daysUpdated SUBSCRIBE (& hit the Bell to get alerted for the new lessons!) http://bit.ly/sub-right-now Key Takeaways / Chapters: 0:00 - Introduction to Autodesk Fusion (Fusion 360) User Interface 0:11 - 1. Data Panel: Accessing the Cloud 0:45 - 2. Application Bar: File Management 1:31 - 3. The Toolbar: Modeling Tools & Workspaces 2:03 - 4. The Canvas: Your 3D World 2:10 - 5. The Browser: Your Table of Contents 2:27 - 6. ViewCube: Camera Controls 2:42 - 7. Marking Menu: The Contextual Wheel 2:54 - 8. Navigation Bar: Movement & Display 3:10 - 9. The Timeline: Your "Time Machine" 3:28 - 8 Key Definitions for Beginners 3:43 - What is the Origin? 3:53 - What are Sketches? 4:03 - What are Sketch Constraints? 4:25 - Why "Fully Defined" (Black Lines) Matters 4:52 - What is the Canvas in Autodesk Fusion? 5:00 - Understanding Parametric Modeling 5:16 - What is a Body? 5:27 - The Power of the Extrude Tool 5:42 - Next Lesson: Navigation & Display Settings KEY DEFINITIONS TO REMEMBER - Origin: The center of your workspace (0,0,0). - Sketch: The 2D foundation of every 3D model. - Sketch Constraints: Geometric rules (like "Vertical") to keep designs accurate. - Fully Defined: When a sketch is locked in place (lines turn from blue to black). - Canvas: The main area where you build and interact with models. - Parametric Modeling: A history-based system where you can edit the past to update the future. - Body: A single, continuous 3D shape or physical object. - Extrude: The most common tool; it gives 2D sketches 3D thickness. If you enjoy this series, please Subscribe and hit the bell icon 🔔 to be notified when new lessons drop! — #Fusion360 #fusion #ProductDesignOnline #LearnFusionIn30Days #ProductDesign #3DModeling #CADforBeginners #AutodeskFusion #LoftTool #IndustrialDesign #autodeskfusion360
Thumbnail
Stop Using Fusion the "Old" Way: NEW 2026 WORKFLOWS
145K views • 3 months ago
Did Autodesk Fusion just break your workflow? If you’re looking for the "New Component" button and it’s gone, don’t panic—Fusion just moved to Intent-Driven Workflows. Day 1 2026 Edition 👉 https://youtu.be/4G2E_DqQteM?si=xWh1aCHGP6dblzwl In the January 2026 update, Fusion introduced three distinct design types: Part, Assembly, and Hybrid. In this video, I’ll explain exactly what these mean, which one you should be using as a beginner or a pro, and how to get that "classic" Fusion feel back if you’re following older tutorials. In this video, you’ll learn: -Why your components seem to be "missing." -The difference between Part Design vs. Assembly Design. -How to use the Hybrid approach for the classic experience. -How to convert design types in the Document Settings. -How to set your default intent type in your Fusion Preferences. SUPPORT KEVIN'S MISSION ↪Making CAD education accessible 1. Kevin's Patreon ➞ https://patreon.com/productdesignonline 2. Buy Kevin a Coffee ➞ https://www.buymeacoffee.com/pdo TIMESTAMPS 0:00 - Intent Driven Design in Autodesk Fusion explained 0:28 - Part Design in Autodesk Fusion 1:10 - Assembly Design in Autodesk Fusion 2:06 - Hybrid Design in Autodesk Fusion 2:39 - Part vs Component in Autodesk Fusion 360 2:52 - Switch Intent in Autodesk Fusion 3:29 - Three tips for Fusion Intent Design 4:01 - Set default Intent in Autodesk Fusion — #Fusion360 #ProductDesignOnline #fusion #autodesk
Thumbnail
Day 1 of Learn Autodesk Fusion in 30 Days! (2026 EDITION)
154K views • 3 months ago
Get the instructional guide bundle (PDF): https://bit.ly/guideBundle Watch Day 2 next 👉 https://youtu.be/_x2Q44UTyrA?si=qLEi0gmiUeLHrmxZ Playlist updated as lessons drop: https://bit.ly/30daysUpdated 
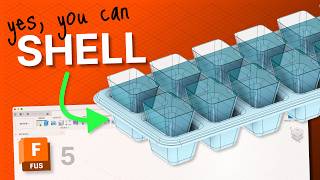
Master Autodesk Fusion (formerly 'Fusion 360') tutorial for beginners by modeling a 2x4 toy block from scratch. In Day 1 of "Learn Fusion in 30 Days," we cover the core 3D modeling tools used in 90% of professional designs: 2D sketch, Extrude, Shell, and Fillet. SUPPORT KEVIN'S MISSION ↪Making CAD education accessible Patreon: https://patreon.com/productdesignonline Buy Kevin a Coffee: https://www.buymeacoffee.com/pdo OFFICIAL 30 DAYS PLAYLIST (2026 EDITION) https://bit.ly/30daysUpdated SUBSCRIBE (& hit the Bell to get alerted for the new lessons!) http://bit.ly/sub-right-now Key Takeaways / Chapters: 0:00 - Introduction to Learn Autodesk Fusion in 30 Days 2026 0:21 - Part Design vs. Assembly Design Explained in Autodesk Fusion 1:15 - Setting Up Preferences & Default Units (Millimeters) in Autodesk Fusion 1:55 - Change Individual Design File Units in Autodesk Fusion 2:20 - Creating Your First 2D Sketch & Constraints in Autodesk Fusion 5:40 - Transforming 2D to 3D with the Extrude Tool in Autodesk Fusion 6:31 - How to Zoom, Pan, and Orbit in Autodesk Fusion 2026 7:52 - Create Projects, Folders, and Save Designs in Fusion 360 09:26 - Create the Studs on Top of the Toy Block 11:15 - WHY to use Solid Rectangular Patterns over Sketch Patterns in Autodesk Fusion 12:28 - Pattern the Studs on the Toy Block 14:29 - Hollowing Out Your Model with Shell in Autodesk Fusion 15:32 - Sketching the Bottom Center columns on the Toy Block 18:25 - Adding Fillets to the Toy Block in Autodesk Fusion 19:19 - Next challenge is Day 2 of Learn Fusion in 30 Days Welcome to the best Autodesk Fusion tutorial for beginners. While many still know this software as Fusion 360, this 2026 edition covers the latest rebranding, software updates, and workflow improvements. Industry expert Kevin Kennedy guides you through "Intent-Driven Design," helping you choose between Part, Assembly, and Hybrid design modes right from the start. You will learn how to transition from a 2-dimensional sketch to a 3-dimensional body using the Extrude command—the most vital tool in any CAD workspace. We also dive into Parametric Modeling, showing you how to use the Timeline to "time travel" and edit your designs. Key best practices covered include why you should prioritize Solid Rectangular Patterns over sketch-based patterns to maintain model performance and "Fully Defining" your geometry to prevent accidental design drift. — #Fusion360 #fusion #ProductDesignOnline #autodeskfusion #autodeskfusion360
Thumbnail
Day 2 of Learn Autodesk Fusion in 30 Days! (2026 EDITION)
78K views • 3 months ago
Get the instructional guide bundle (PDF): https://bit.ly/guideBundle Bottle reference image (free): https://bit.ly/imageDay2 How to see inside your bottle: https://youtube.com/shorts/NfVwOnwqQfo Day 3 (2026) 👉 https://youtu.be/JG5Z4ZJmkmE?si=MR_VVndFVbL6lnk1 Playlist updated as lessons drop: https://bit.ly/30daysUpdated Welcome to Day 2 of the official "Learn Fusion in 30 Days" series! Today, you'll design a glass soda bottle while we reinforce concepts from Day 1. You'll learn how to insert and calibrate reference images (Canvas), sketch with fit point splines, revolve, and add real appearances. SUPPORT KEVIN'S MISSION (Making CAD education accessible) Patreon: https://patreon.com/productdesignonline Buy Kevin a Coffee: https://www.buymeacoffee.com/pdo OFFICIAL 30 DAYS PLAYLIST (2026 EDITION) https://bit.ly/30daysUpdated SUBSCRIBE (& hit the Bell to get alerted for the new lessons!) http://bit.ly/sub-right-now Key Takeaways / Chapters: 0:00 - Day 2 of Learn Autodesk Fusion in 30 Days 2026 Edition 0:20 - Start a new design file with Part Design 0:57 - How to insert a reference image in Autodesk Fusion 360 2:02 - How to calibrate a reference image in Autodesk Fusion 360 4:30 - Sketching half of the bottle shape 6:27 - Using Fit Point Spline to sketch the curved stem of the bottle 9:36 - Adding a coincident constraint in Autodesk Fusion 360 11:05 - How to use Revolve in Autodesk Fusion 360 11:52 - Comparing centerlines and construction lines in Autodesk Fusion 13:20 - Changing the visual style in Autodesk Fusion (2026) 14:08 - Most common shell error and how to fix it 14:34 - Adding Fillets to the bottom and top of the bottle 15:25 - Reorder timeline operations in Autodesk Fusion 360 16:00 - Adding real appearances in Autodesk Fusion (2026) 16:42 - Learn how to use Sweep on Day 3 Welcome to the best Autodesk Fusion tutorial for beginners. While many still know this software as Fusion 360, this 2026 edition covers the latest software updates and workflow improvements. Industry expert Kevin Kennedy guides you through the best practices and core workflows of Autodesk Fusion. You’ll learn how to calibrate a canvas, use parametric constraints to ensure a 1:1 scale for manufacturing, and master the "Revolve" command to create symmetrical 3D bodies. We also dive deep into troubleshooting the Shell Command and using a "Timeline Trick" to reorder features—a critical skill for any parametric designer. — #Fusion360 #fusion #ProductDesignOnline #LearnFusionIn30Days #ProductDesign #3DModeling #CADforBeginners #autodeskfusion360 #autodeskfusion #IndustrialDesign
Thumbnail
Day 3 of Learn Autodesk Fusion in 30 Days! (2026 EDITION)
45K views • 3 months ago
Get the instructional guide bundle (PDF): https://bit.ly/guideBundle Day 3 Paperclip dimensions (free image) 👉 https://bit.ly/day3dimensions Day 4 (2026) 👉 https://youtu.be/rcD7wcNFwsU Playlist updated as lessons drop: https://bit.ly/30daysUpdated Master Autodesk Fusion (formerly 'Fusion 360') tutorial for beginners by modeling a paperclip from scratch. On Day 3 of "Learn Fusion in 30 Days," we start to cover professional sketch techniques and how to use the Sweep tool. SUPPORT OUR MISSION: Making CAD education accessible Patreon: https://patreon.com/productdesignonline Buy Kevin a Coffee: https://www.buymeacoffee.com/pdo OFFICIAL 30 DAYS PLAYLIST (2026 EDITION) https://bit.ly/30daysUpdated SUBSCRIBE (& hit the Bell to get alerted for the new lessons!) http://bit.ly/sub-right-now Key Takeaways / Chapters: 0:00 - Day 3 of Learn Fusion in 30 Days - The Paperclip 0:17 - Setting up your Part Design file 0:26 - Understanding the Sweep Tool (Profile vs. Path) 0:35 - Sketching the Path: Best practices & Origin points 0:54 - Using the Line Tool & Automatic Constraints 3:06 - How to "Fully Define" a sketch (The Red Lock Icon) 4:14 - Converting geometry to Construction Lines 4:42 - Mastering the Tangent Arc Tool 5:31 - Naming sketches for Parametric Modeling 6:15 - Creating the Sketch Profile on the XZ Plane 7:26 - Applying the Solid Sweep Command 8:15 - Understanding Chain Selection in Fusion 360 8:43 - Understanding Sweep Distance (0 to 1) 9:35 - What’s coming on Day 4: The Glass Bottle Master the Sweep tool and professional sketching habits in Day 3 of the Learn Fusion in 30 Days series! In this tutorial, Kevin Kennedy walks you through modeling a common paperclip to demonstrate how to turn 2D paths into 3D geometry. You’ll start to learn why "fully defined" sketches are the backbone of professional CAD, how to use constraints effectively, and the secret to using the Sweep command’s distance values. — #Fusion360 #fusion #ProductDesignOnline
Thumbnail
Square to Circle? EASY | Day 4 of Learn Autodesk Fusion in 30 Days! (2026 EDITION)
36K views • 3 months ago
Get the Written Instructional Guides (Bundle): https://bit.ly/guideBundle Day 5 (2026) 👉 https://youtu.be/I6BooYAo1mg Welcome to Day 4 of the official "Learn Autodesk Fusion in 30 Days" series (2026 version)! Today, we’re moving beyond simple extrusions and revolves to tackle a complex glass bottle. You’ll learn how to transition between different shapes smoothly using the Loft Tool, manage Offset Construction Planes, and ensure your geometry is perfect using the Intersect command. Whether you're a beginner or looking to sharpen your parametric modeling skills, this lesson covers the essential "Best Practices" for creating professional-grade 3D models. SUPPORT KEVIN'S MISSION (Making CAD education accessible) Patreon: https://patreon.com/productdesignonline Buy Kevin a Coffee: https://www.buymeacoffee.com/pdo OFFICIAL 30 DAYS PLAYLIST (2026 EDITION) https://bit.ly/30daysUpdated SUBSCRIBE (& hit the Bell to get alerted for the new lessons!) http://bit.ly/sub-right-now Key Takeaways / Chapters: 0:00 - Introduction to Day 4 of Learn Fusion in 30 Days 0:24 - What is the Loft Tool? 0:40 - Sketching Profile 1: Center Rectangles 2:01 - Modeling Fillets vs. Sketch Fillets 2:30 - Creating Offset Construction Planes 3:40 - Setting up Profiles 2, 3, and 4 6:37 - Activating the Solid Loft Command 8:42 - Intersect Tool for Perfect Guide Rails 10:55 - Sketching & Mirroring Continuous Rails 12:44 - Refining the Shape with Rails 14:24 - Solving Common Loft Errors 15:47 - Shell Command & Modeled Threads 16:01 - Solving Common Shell Errors with Lofted Objects KEY TOPICS COVERED -The Loft Tool: Connecting multiple closed profiles into one organic shape. -Offset Planes: How to create sketches that don't sit on the origin. -Intersect Command: The "secret" to making sure your guide rails actually touch your profiles. -Modeled vs. Cosmetic Threads: Ensuring your 3D prints have functional threading. -Shell Command Troubleshooting: Dealing with curvature errors. If you enjoy this series, please Subscribe and hit the bell icon 🔔 to be notified when new lessons drop! — #Fusion360 #fusion #ProductDesignOnline #LearnFusionIn30Days #ProductDesign #3DModeling #CADforBeginners #AutodeskFusion #LoftTool #IndustrialDesign #autodeskfusion360
Thumbnail
The 'Secret' Shell Trick | Day 5 of Learn Autodesk Fusion in 30 Days! (2026 EDITION)
32K views • 2 months ago
Get the Written Instructional Guides (Bundle): https://bit.ly/guideBundle Day 6 (2026) 👉 https://youtu.be/n854QDOAVqg Welcome to Day 5 of the official "Learn Autodesk Fusion in 30 Days" series (2026 version)! Today, we are modeling a functional Ice Cube Tray. While it looks simple, this project introduces heavy-hitting professional workflows: Tapered Extrudes, referencing Dimensions (fx), and a "secret" way to use the Shell command that most beginners miss. By the end of this video, you’ll understand how to subtract material from 3D blocks and how to create complex, thin-walled parts with ease. COMPUTE TYPES EXPLAINED See a more detailed explanation on our website - https://bit.ly/computeTypes Optimized - This is the fastest compute method. It creates the pattern by duplicating the faces of the original feature rather than recalculating the entire feature's logic. Identical - This method creates exact replicas of the original feature by calculating the first instance and then copying the resulting geometry to all other locations. Adjust - This is the most computationally expensive but "smartest" method. It recalculates each instance individually based on the surrounding geometry. SUPPORT KEVIN'S MISSION (Making CAD education accessible) Patreon: https://patreon.com/productdesignonline Buy Kevin a Coffee: https://www.buymeacoffee.com/pdo OFFICIAL 30 DAYS PLAYLIST (2026 EDITION) https://bit.ly/30daysUpdated SUBSCRIBE (& hit the Bell to get alerted for the new lessons!) http://bit.ly/sub-right-now Key Takeaways / Chapters: 0:00 - Introduction to Day 5 of Learn Fusion in 30 Days 0:37 - Starting with the "Block Method" (Base profile) 0:45 - Why use a Center Rectangle? 1:21 - Extruding the Base of the tray 1:39 - Sketching the First Cutout 3:00 - PRO TIP: Using FX Dimensions (Linking Values) 4:42 - Tapering an Extrude (The Secret to Molded Parts) 5:10 - Adding Fillets to Internal Faces 5:47 - Rectangular Pattern: Best Practices for Performance 6:06 - Setting Up the Pattern Axis & Spacing 6:39 - Explaining the Distribution type 7:15 - Optimized Compute Type Explained 7:37 - THE SECRET: Multi-Face Shell Command 8:30 - Prepping the Corner Fillets 9:00 - Sketching the Outer Flange Profile 11:02 - Using Constraints vs. Dimensions (Best Practice) 11:18 - The Coincident Constraint explained in Autodesk Fusion 11:45 - Sweeping the Profile Around the Rim 12:21 - Finishing Touches with a Fillet KEY TOPICS COVERED -Taper Angle: Essential for injection molding and casting—learn why we use a -10° taper. -FX Dimensions: Learn how to link dimensions so one change updates your entire sketch automatically. -Shell (Advanced): We aren't just hollowing out the top; we're selecting 5 faces to create an exterior contour. -Sweep: Using 3D edges as paths to create a rim/flange. -Rectangular Pattern: Creating multiple instances while maintaining software performance. If you enjoy this series, please Subscribe and hit the bell icon 🔔 to be notified when new lessons drop! — #Fusion360 #fusion #ProductDesignOnline #LearnFusionIn30Days #ProductDesign #3DModeling #CADforBeginners #AutodeskFusion #LoftTool #IndustrialDesign #autodeskfusion360
Thumbnail
Stop using the Thread tool wrong | Day 6 of Learn Autodesk Fusion in 30 Days (2026 EDITION)
26K views • about 2 months ago
Get the Written Instructional Guides (Bundle): https://bit.ly/guideBundle Day 7 (2026) 👉 https://youtu.be/iiXxXSkGXI4 Welcome to Day 6 of the official "Learn Autodesk Fusion in 30 Days" series (2026 version)! Today, we are modeling a functional Hex Nut. While it looks simple, this project introduces heavy-hitting professional workflows: midplane construction planes, using the thread tool, restarting thread directions, creating custom chamfer, creating regular chamfers, and more! MIRROR COMPUTE TYPES EXPLAINED -Optimized: This is the fastest computing method available. Instead of "thinking" about how the feature was originally built, Fusion simply takes the faces of the original feature and duplicates them across the mirror plane. -Identical: This method creates exact replicas of the original feature. Fusion calculates the geometry of the source feature once and then "pastes" that identical result onto the new location across the mirror plane. -Adjust: This is the most "intelligent" but computationally heavy method. Fusion treats the mirror as a brand-new feature and re-solves the original parameters and constraints against the geometry on the other side of the mirror plane. SUPPORT KEVIN'S MISSION (Making CAD education accessible) Patreon: https://patreon.com/productdesignonline Buy Kevin a Coffee: https://www.buymeacoffee.com/pdo OFFICIAL 30 DAYS PLAYLIST (2026 EDITION) https://bit.ly/30daysUpdated SUBSCRIBE (& hit the Bell to get alerted for the new lessons!) http://bit.ly/sub-right-now Key Takeaways / Chapters: 0:00 - Introduction to Day 6 of Learn Fusion in 30 Days 0:38 - Creating the Hexagon Sketch (Circumscribed Polygon) 01:15 - Fully Defining the Polygon with Constraints 01:35 - Extruding the Nut Body 02:20 - Sketching the Chamfer Profile on the XZ Plane 03:10 - Using the Intersect Command for Accuracy 03:41 - Defining the Triangle Sketch with Equal Constraints 05:27 - Best Practice: Renaming Browser Objects 06:09 - Revolve Cut: Creating the Beveled Edge 07:11 - Creating a Midplane for Symmetry 07:40 - Mirroring Features Across the Body 08:44 - Timeline Management: Rolling Back History 09:08 - Creating the Center Hole (Extrude to All) 10:26 - Applying the Thread Tool & Modeled Settings 11:41 - Pro Tip: Controlling Thread Start Direction 12:41 - Updating the Mirror to Include the Chamfer KEY TOPICS COVERED -Polygons & Constraints: How to quickly sketch a 6-sided hex shape and lock it in place with constraints. -Intersect Tool: Using existing 3D edges to create perfect snap points for new sketches. -Midplanes & Mirroring: Creating a center plane to instantly flip features from one side of the nut to the other. -Timeline Management: Moving the timeline marker to "go back in time" and add details before a mirror occurs. -Modeled Threads: A pro trick for positioning threads correctly and ensuring they are 3D-printable. If you enjoy this series, please Subscribe and hit the bell icon 🔔 to be notified when new lessons drop! — #Fusion360 #fusion #ProductDesignOnline #LearnFusionIn30Days #ProductDesign #3DModeling #CADforBeginners #AutodeskFusion #LoftTool #IndustrialDesign #autodeskfusion360
Thumbnail
Try this instead | Day 7 of Learn Autodesk Fusion in 30 Days (2026 EDITION)
19K views • about 2 months ago
Get the Written Instructional Guides (Bundle): https://bit.ly/guideBundle Day 8 (2026) 👉 https://youtu.be/KN1fkOK7EHQ Welcome to Day 7 of the official "Learn Autodesk Fusion in 30 Days" series (2026 version)! Today, we are modeling a Bike Handlebar Grip. While it looks simple, this project introduces professional tools that are key to making predictable parametric models: Intersect and Project explained, center aligning text to models, embossing text, professional extrude tricks, and more! SUPPORT KEVIN'S MISSION (Making CAD education accessible) Patreon: https://patreon.com/productdesignonline Buy Kevin a Coffee: https://www.buymeacoffee.com/pdo OFFICIAL 30 DAYS PLAYLIST (2026 EDITION) https://bit.ly/30daysUpdated SUBSCRIBE (& hit the Bell to get alerted for the new lessons!) http://bit.ly/sub-right-now Key Takeaways / Chapters: 0:00 - Introduction to Day 7 of Learn Fusion in 30 Days 0:27 - Sketching the Base Cylinder 1:10 - Creating 3D Text & Font Requirements 2:47 - Constraining Text with the Intersect Tool 4:15 - How to Use the Emboss Tool 5:00 - Project vs. Intersect: Referencing Geometry 6:19 - Offsetting and Sketching the Grip Ring 7:50 - Creating a Rectangular Pattern of Bodies 9:08 - Advanced Extrude: "To Object" & Start Offsets 10:52 - Using the Shell Tool Parametrically 11:47 - Combining Multiple Bodies 12:44 - Testing the Parametric Model (The Power of Project) 13:49 - Pro Tip: Using the Undo History List 14:11 - Final Details & Adding Appearances KEY TOPICS COVERED -Master the Emboss Tool: Learn how to wrap, raise, or recess 3D text and sketches around curved surfaces like cylinders. -Understand Project vs. Intersect: Discover how to reference existing geometry from other parts of your model to create a fully parametric design. -Control Complex Patterns: Use the Rectangular Pattern tool with separate bodies to create intricate grip textures efficiently. -Dynamic Design Updates: See how to use constraints and the Projection Link so your entire model automatically adjusts when you change a single dimension. If you enjoy this series, please Subscribe and hit the bell icon 🔔 to be notified when new lessons drop! — #Fusion360 #fusion #ProductDesignOnline #LearnFusionIn30Days #ProductDesign #3DModeling #CADforBeginners #AutodeskFusion #LoftTool #IndustrialDesign #autodeskfusion360
Thumbnail
The Secret to Thin Wall Designs | Day 8 of Learn Autodesk Fusion 360 in 30 Days (2026 EDITION)
17K views • about 1 month ago
Get the Written Instructional Guides (Bundle): https://bit.ly/guideBundle Send your Fusion designs to your slicer: https://youtu.be/LJTx9z26M0M Day 9 (2026) 👉 https://youtu.be/Pj38QvHNI_Q Welcome to Day 8 of the official "Learn Autodesk Fusion in 30 Days" series (2026 version)! Today, we are modeling a 3D printable door stop. Today, we'll look at how Thin Extrude can save you time compared to using the Shell tool. You'll also learn how to add new selection sets when applying Filelts, how to extrude 'to object', and more! PRINT SETTINGS 3D print settings: productdesignonline.com/d8 My favorite TPU filament: https://amzn.to/48PrFgk (affiliate) SUPPORT KEVIN'S MISSION (Making CAD education accessible) Patreon: https://patreon.com/productdesignonline Buy Kevin a Coffee: https://www.buymeacoffee.com/pdo OFFICIAL 30 DAYS PLAYLIST (2026 EDITION) https://bit.ly/30daysUpdated SUBSCRIBE (& hit the Bell to get alerted for the new lessons!) http://bit.ly/sub-right-now Key Takeaways / Chapters: 00:00 - Introduction to Day 8 of Learn Autodesk Fusion in 30 Days 2026 00:35 - Sketching the Primary Triangle Profile 01:57 - Thin Extrude vs. Shell Command 03:06 - Efficient Filleting with Selection Sets 04:22 - Sketching & Constraining the First Grip 05:44 - Parametric "To Object" Extrude Best Practices 06:33 - Using Pattern on Path for Textures 07:26 - Pro Tip: Finding Total Path Length 08:01 - Orientation & Instance Suppression 08:52 - Internal Support Structure & Tangent Constraints 10:05 - Circular Thin Extrude & Wall Locations 12:11 - Why STEP Files are Better than STL 12:35 - Exporting for 3D Printing 13:21 - Day 9 Light Bulb with primitives KEY TOPICS COVERED -Master the Thin Extrude: Learn how to create complex walls and hollow structures instantly from a single sketch line without using the Shell command. -Control Pattern on Path: Discover how to wrap features around complex contours and use the "Orientation" setting to make objects follow a curved track. -Smart Parametric Tangency: Use Tangent constraints to build internal supports that automatically resize and stay connected when your main dimensions change. -Optimizing for 3D Printing: Understand why you should export as STEP files instead of STL for smoother curves and better print quality. If you enjoy this series, please Subscribe and hit the bell icon 🔔 to be notified when new lessons drop! — #Fusion360 #fusion #ProductDesignOnline #LearnFusionIn30Days #ProductDesign #3DModeling #CADforBeginners #AutodeskFusion #LoftTool #IndustrialDesign #autodeskfusion360
Thumbnail
How to transition between shapes | Day 9 of Learn Autodesk Fusion in 30 Days (2026 EDITION)
13K views • about 1 month ago
Get the instructional guide bundle (PDF): https://bit.ly/guideBundle Official playlist updated as lessons drop: https://bit.ly/30daysUpdated Welcome to Day 9 of the official "Learn Autodesk Fusion in 30 Days" series (2026 version)! Today, we are modeling an LED light bulb. The focus of this lesson is to quickly create 3D models for visual purposes only. You'll learn how to use Fusion's primitive tools, including some of the drawbacks of primitives. I'll also share the easiest way to create a smooth transition between the cylinder and sphere. SUPPORT KEVIN'S MISSION ↪Making CAD education accessible Patreon: https://patreon.com/productdesignonline Buy Kevin a Coffee: https://www.buymeacoffee.com/pdo OFFICIAL 30 DAYS PLAYLIST (2026 EDITION) https://bit.ly/30daysUpdated SUBSCRIBE (& hit the Bell to get alerted for the new lessons!) http://bit.ly/sub-right-now Key Takeaways / Chapters: 00:00 - Introduction to Day 9 of Learn Autodesk Fusion in 30 Days 2026 00:41 - Creating the base stem using the Cylinder primitive. 01:12 - Why use Primitives vs. Sketches and best practices. 01:54 - Using the Intersect Tool to create reference points for the bulb. 02:45 - Drawing and constraining construction lines for sphere placement. 03:51 - Adding the Sphere primitive and joining bodies. 04:29 - Using Fillets to create a smooth transition between shapes. 05:12 - Applying and editing Appearances (LED and Plastic). 06:33 - Creating the threaded base as a New Body. 07:12 - Using the Coil Tool to simulate an Edison screw thread. 08:51 - Refining the thread with Chamfers and Fillets. 09:30 - Adding the electrical foot contact and finishing touches. 10:23 - Day 10, create a phone case KEY TOPICS COVERED -This lesson focuses on using Fusion’s primitive tools to rapidly prototype a realistic LED lightbulb for visual rendering and communication. -You will learn how to use the Intersect tool to create precise reference geometry that bridges the gap between primitive shapes and custom sketches. -The tutorial also demonstrates how to simulate complex Edison screw threads using the Coil tool and manage multiple materials by creating distinct 3D bodies. -By the end, you’ll understand how to balance modeling speed with visual accuracy using fillets, chamfers, and customized appearances. If you enjoy this series, please Subscribe and hit the bell icon 🔔 to be notified when new lessons drop! — #Fusion360 #fusion #ProductDesignOnline #autodeskfusion #autodeskfusion360
Thumbnail
Day 10 of Learn Fusion 360 in 30 Days for Complete Beginners! - 2023 EDITION
285K views • over 3 years ago
New to Fusion 360? This is a brand new 2023 version of Day #10 of "Learn Fusion 360 in 30 Days for Complete Beginners" - the most popular Fusion 360 course on the internet! Get Kevin's Fusion 360 Masterclass at https://ProductDesignOnline.com/courses TUTORIAL RESOURCES ➞ https://productdesignonline.com/d10 CHECKLIST FOR BEGINNERS ➞ http://bit.ly/f360checklist Full course on YouTube: https://bit.ly/30daysUpdated **Support our free tutorials** PayPal - https://paypal.com/paypalme/productdesignonline/30 Patreon - https://patreon.com/productdesignonline Say Thanks w/Coffee - https://buymeacoffee.com/pdo TOP FUSION 360 PLAYLISTS http://bit.ly/learn-fusion360 http://bit.ly/woodworker-playlist http://bit.ly/3D-printing-playlist http://bit.ly/sculpt-playlist SUBSCRIBE (& Hit the Bell!) http://bit.ly/sub-right-now TIMESTAMPS 00:00 - Day 10 3D Model a Phone Case in Autodesk Fusion 360 00:33 - Open STEP file in Fusion 360 01:20 - Use Joints to lay the model flat 02:07 - Sketch around the outside of the phone model 04:07 - Sweep around the phone in Fusion 360 04:45 - Fill in the back of the phone case 06:28 - Chamfer the cutouts 07:20 - Offset faces for the charging port hole 08:11 - Custom Design on the back of phone case 08:25 - Next Lesson Day 11 — Disclaimer: This video description may contain affiliate links, meaning I get a small commission if you decide to make a purchase through my links, at no cost to you. — #Fusion360 #ProductDesignOnline #fusion360tutorial #autodeskfusion360 #autodesk
Thumbnail
Intro to surfaces | Day 11 of Learn Autodesk Fusion 360 in 30 Days (2026 EDITION)
13K views • about 1 month ago
Get the instructional guide bundle (PDF): https://bit.ly/guideBundle Official playlist updated as lessons drop: https://bit.ly/30daysUpdated Welcome to Day 11 of the official "Learn Autodesk Fusion in 30 Days" series (2026 version)! Today, we are modeling a dog bowl using Surface modeling tools. The focus of this lesson is to show you how easy it is to create simple surface models with Offset and Thicken commands. You will also use the Hybrid design intent and learn about the use of Components. SUPPORT KEVIN'S MISSION ↪Making CAD education accessible Patreon: https://patreon.com/productdesignonline Buy Kevin a Coffee: https://www.buymeacoffee.com/pdo OFFICIAL 30 DAYS PLAYLIST (2026 EDITION) https://bit.ly/30daysUpdated SUBSCRIBE (& hit the Bell to get alerted for the new lessons!) http://bit.ly/sub-right-now Key Takeaways / Chapters: 00:00 - Introduction to Day 11 of Learn Autodesk Fusion in 30 Days 2026 00:14 - Setting up Hybrid Design & Saving 00:33 - Creating & Naming Components (Metal Bowl) 01:28 - Creating the Rubber Grip Component 01:59 - The Importance of the 'Active' Component 02:25 - Sketching the Bowl Profile 03:08 - Using Tab for Dimensions & Angles 04:16 - Using the Trim Tool (and its risks) 05:23 - Fully Defining the Sketch with Constraints 06:24 - Surface vs. Solid: The Open Profile Concept 07:00 - The Surface Revolve Tool 08:15 - Adding Fillets to Surface Edges 08:44 - Understanding the 'Yellow' Surface Face 09:15 - Using Thicken to create a Solid Body 10:58 - Activating the Rubber Grip Component 11:47 - Pro Tip: Active Component Visibility Settings 12:08 - Creating the Grip with the Surface Offset Tool 12:48 - Applying Thickness to the Rubber Grip 13:15 - Adding Appearances (Stainless Steel & Rubber) 13:41 - Inspecting the fit with Section Analysis KEY TOPICS COVERED -Hybrid Design Intent: How to manage multiple parts (Metal & Rubber) in one file. -Internal Components: Setting up a clean Browser hierarchy for manufacturing. -Surface vs. Solid: Understanding why surface profiles don't need to be "closed" loops. -The Thicken Tool: How to turn an infinitely thin surface into a manufacturable 3D object. -Clearance & Offsets: Creating perfectly fitting parts with the Offset tool. If you enjoy this series, please Subscribe and hit the bell icon 🔔 to be notified when new lessons drop! — #Fusion360 #fusion #ProductDesignOnline #autodeskfusion #autodeskfusion360
Thumbnail
Modeling a 3-part screwdriver | Day 12 of Learn Autodesk Fusion 360 in 30 Days (2026 EDITION)
7.7K views • 24 days ago
Get the instructional guide bundle (PDF): https://bit.ly/guideBundle Official playlist updated as lessons drop: https://bit.ly/30daysUpdated Welcome to Day 12 of the official "Learn Autodesk Fusion in 30 Days" series (2026 version)! Today, you are designing a slotted screwdriver. The focus of this lesson is to show you how to create a 3-part model (handle, shank, and tip) in the Hybrid design type. You will also learn to use the circular pattern tool, 3-point arc, and many more tips! SUPPORT KEVIN'S MISSION ↪Making CAD education accessible Patreon: https://patreon.com/productdesignonline Buy Kevin a Coffee: https://www.buymeacoffee.com/pdo SUBSCRIBE (& hit the Bell to get alerted for the new lessons!) http://bit.ly/sub-right-now Key Takeaways / Chapters: 00:00 - Introduction to Day 12 of Learn Autodesk Fusion in 30 Days 2026 00:13 - Hybrid Design Intent & Components 01:37 - Sketching & Extruding the Handle 02:01 - Creating the First Grip Cutout 03:11 - Circular Pattern for Handle Grooves 04:21 - Thumb Rest: Intersect & 3-Point Arc 06:14 - Revolving the Thumb Rest Profile 06:40 - Testing Parametric Dimensions 07:30 - Shank Cutout & Renaming Sketches 08:19 - Applying Fillets to the Handle 10:03 - Creating the Adaptive Screwdriver Shank 11:40 - New Component: Screwdriver Tip 12:18 - Modeling the Screwdriver Tip 14:37 - Mirroring Features & Final Polish KEY TOPICS COVERED -Hybrid Design Intent: Managing assemblies with multiple manufacturable parts in a single file. -Component Management: Utilizing Internal Components, Root Components, and Active Component status. -Circular Patterning: Using "Feature" mode vs. "Sketch" mode for optimized processing. -Intersect Command: Creating Projection Links to ensure dependent geometry (Shank) follows parent geometry (Handle). -Parametric Resilience: Naming sketches and reordering the timeline to prevent "yellow/red" errors. -Advanced Filleting: Managing multiple selection sets and radii for complex ergonomic surfaces. If you enjoy this series, please Subscribe and hit the bell icon 🔔 to be notified when new lessons drop! — #Fusion360 #fusion #ProductDesignOnline #autodeskfusion #autodeskfusion360
Thumbnail
You’ll regret breaking this rule | Day 13 of Learn Autodesk Fusion 360 in 30 Days (2026 EDITION)
6.2K views • 10 days ago
Tea Kettle Demo file: https://a360.co/4vaXxVo Get the instructional guide bundle (PDF): https://bit.ly/guideBundle Official playlist updated as lessons drop: https://bit.ly/30daysUpdated Welcome to Day 13 of the official "Learn Autodesk Fusion in 30 Days" series (2026 version)! You will discover the power of Design Intent. You'll learn how to properly use geometric constraints and mathematical formulas to create predictable, parametric 3D models that don't break when you change dimensions. We also cover the critical difference between standard copying and Paste New, walk through a real-world tea kettle challenge, and break down 4 essential sketching best practices to keep your Fusion timelines clean and high-performing! SUPPORT KEVIN'S MISSION ↪Making CAD education accessible Patreon: https://patreon.com/productdesignonline Buy Kevin a Coffee: https://www.buymeacoffee.com/pdo SUBSCRIBE (& hit the Bell to get alerted for the new lessons!) http://bit.ly/sub-right-now Key Takeaways / Chapters: 00:00 - Introduction to Design Intent & Importance of Fully-defined Sketches 00:40 - What do we know about the model? 01:45 - Creating a New Component & Design Intent 1 02:20 - Applying Geometric Sketch Constraints (Equal, Parallel, Perpendicular) 04:02 - Testing Degrees of Freedom (Click and Drag Method) 06:00 - Building Parametric Intelligence with Formulas and Equations 07:25 - "Paste New" vs. Standard Copy & Paste for Independent Components 08:23 - Design Intent 2 08:47 - Isolating & Deleting Coincident Constraints 09:36 - Dimensioning and Vertically Aligning Geometry using Constraints 05:40 - Practical Challenge: Editing the Tea Kettle Demo File 10:50 - Solution to the Tea Kettle Challenge 12:47 - 4 Essential CAD Sketching Best Practices for Fusion 4 SKETCH BEST PRACITCES IN FUSION 1. Keep Sketches Simple: Rely on 3D modeling features rather than dense sketches to prevent performance lag and make future editing easier. 2. Use Solid Fillets over Sketch Fillets: Apply fillets to the 3D model instead of the sketch to avoid breaking constraints and causing errors later 3. Mirror 3D Bodies, Not Sketches: Mirror final 3D bodies or components to drastically reduce sketch complexity and improve software performance. 4. Pattern Features in 3D: Use the 3D pattern tool instead of sketch patterns to avoid major headaches when updating your design. If you enjoy this series, please Subscribe and hit the bell icon 🔔 to be notified when new lessons drop! — #Fusion360 #fusion #ProductDesignOnline #autodeskfusion #autodeskfusion360
Thumbnail
Practice ALL Fusion Sketch Constraints | Day 14 of Learn Autodesk Fusion in 30 Days (2026 EDITION)
2.8K views • 1 day ago
Challenge PDF and Fusion file: https://bit.ly/day14challenge Get the instructional guide bundle (PDF): https://bit.ly/guideBundle Official playlist updated as lessons drop: https://bit.ly/30daysUpdated Welcome to Day 14 of the official "Learn Autodesk Fusion in 30 Days" series (2026 version)! Change one single dimension, and your entire design twists into a chaotic mess. We’ve all been there! The biggest mistake Fusion beginners make is skipping sketch constraints to save time, only to lose hours later fixing broken geometry that cascades through the timeline. Today, you will learn how to use all 13 sketch constraints in Autodesk Fusion 360 while you create a receptacle outlet cover. SUPPORT KEVIN'S MISSION ↪Making CAD education accessible Patreon: https://patreon.com/productdesignonline Buy Kevin a Coffee: https://www.buymeacoffee.com/pdo SUBSCRIBE (& hit the Bell to get alerted for the new lessons!) http://bit.ly/sub-right-now Key Takeaways / Chapters: 00:00 - The #1 Beginner Mistake in Fusion 00:27 - What are Sketch Constraints? 01:18 - Pro-Tip: Fast Line Creation & Deleting Auto-Constraints 02:06 - Coincident Constraint (The Most Used Tool) 03:00 - Parallel & Perpendicular Constraints 03:49 - Horizontal/Vertical Constraint & Fixing Over-Constrained Errors 05:02 - Equal Constraint & Deleting Geometry 05:32 - Midpoint Constraint & Using Construction Lines 07:00 - Pro-Tip: Bypassing Automatic Snapping 07:45 - Symmetry Constraint (And When to Avoid It) 10:07 - Best Practice & Designing with "Design Intent" 11:02 - Tangent Constraint (Smooth G1 Curves) 12:44 - Concentric Constraint vs Coincident 13:26 - Centering Your Sketch to the Origin 14:09 - Adding Dimensions to Fully Define the Sketch 15:34 - Fix/Unfix Constraints 16:04 - Collinear Constraints 16:23 - Curvature Constraint (Advanced G2 Continuity) 16:49 - New Polygon Constraint (March 2026 Update) 17:12 - Today's Challenge: Fully Constrain the Fusion Logo! KEY TOPICS COVERED -What are Constraints? Geometric relationships that control the position and behavior of sketch objects, making your models stable, fast, and predictable. -The "Design Intent" Strategy: Baking "intelligence" into your sketches so that when you change a dimension later, the model scales and updates exactly how you intended. -Beware of Over-Constraining: Fusion can't solve conflicting mathematical equations. If you get an error, a geometric relationship is already being forced by another constraint or dimension. -Pro-Tip for Clean Workspaces: Use the Sketch Palette settings to toggle off the visibility of constraints and construction lines when your sketch gets visually cluttered. -Symmetry Warning: Use the Symmetry constraint with caution on complex sketches to avoid sketch latency (lag). For heavy geometry, mirror or pattern the 3D solid features instead! If you enjoy this series, please Subscribe and hit the bell icon 🔔 to be notified when new lessons drop! — #Fusion360 #fusion #ProductDesignOnline #autodeskfusion #autodeskfusion360
Thumbnail
Day 15 of Learn Fusion 360 in 30 Days for Complete Beginners! - 2023 EDITION
139K views • almost 3 years ago
New to Fusion 360? This is a brand new 2023 version of Day #15 of "Learn Fusion 360 in 30 Days for Complete Beginners" - the most popular Fusion 360 course on the internet! Get Kevin's Fusion 360 Masterclass at https://ProductDesignOnline.com/courses TUTORIAL RESOURCES ➞ https://productdesignonline.com/d15 CHECKLIST FOR BEGINNERS ➞ http://bit.ly/f360checklist Full course on YouTube: https://bit.ly/30daysUpdated SUPPORT KEVIN'S TUTORIALS Patreon ➞ https://patreon.com/productdesignonline TIMESTAMPS 00:00 - Day 15 3D Model a Painters Tripod in Autodesk Fusion 360 00:30 - Creating a fully defined sketch 02:30 - Finding the centroid of the triangle by projecting geometry 03:45 - Fusion 360 Loft to a single point 0424 - Projecting geometry from the pyramid 06:00 - Create a construction axis in Autodesk Fusion 360 06:43 - Fusion 360 Pattern Compute types 07:13 - Copy and Paste Components in Autodesk Fusion 360 09:31 - Day 16 of Learn Fusion 360 in 30 Days — Disclaimer: This video description may contain affiliate links, meaning I get a small commission if you decide to make a purchase through my links, at no cost to you. — #Fusion360 #ProductDesignOnline #fusion360tutorial #autodeskfusion360 #autodesk
Thumbnail
Convert STL to Solid in Fusion 360 | Day 18 of Learn Fusion 360 in 30 Days - 2023 EDITION
200K views • over 2 years ago
Learn how to Convert STL Mesh files to Solid Bodies in Fusion 360, allowing you to customize or alter your downloaded STL file. New to Fusion 360? This is a brand new 2023 version of Day #18 of "Learn Fusion 360 in 30 Days for Complete Beginners" - the most popular Fusion 360 course on the internet! Learn faster with Kevin's Fusion 360 Masterclass at https://ProductDesignOnline.com/courses DEMO FILE ➞ https://productdesignonline.com/d18 CHECKLIST FOR BEGINNERS ➞ http://bit.ly/f360checklist $50 off Fusion 360 Subscription: http://aklam.io/cUdTJq Full course on YouTube: https://bit.ly/30daysUpdated **Support our free tutorials** PayPal - https://paypal.com/paypalme/productdesignonline/30 Patreon - https://patreon.com/productdesignonline Say Thanks w/Coffee - https://buymeacoffee.com/pdo TIMESTAMPS 00:00 - Convert STL to Solid in Fusion 360 Core Workflow 00:15 - Key Terminology explained 01:12 - Insert Mesh in Fusion 360 02:07 - How to Use the Convert Mesh tool in Fusion 360 04:42 - Generate Face Groups in Fusion 360 05:44 - Fusion 360 Convert Mesh Prismatic explained 07:43 - Tops to Convert STL Mesh files in Autodesk Fusion 360 08:36 - Watch the next lesson Day 19 — Disclaimer: This video description may contain affiliate links, meaning I get a small commission if you decide to make a purchase through my links, at no cost to you. — #Fusion360 #ProductDesignOnline
Thumbnail
Intro to User Parameters and Joints | Day 19 of Learn Fusion 360 in 30 Days - 2023 EDITION
139K views • over 2 years ago
Learn how to create dynamic 3D models by leveraging User Parameters in Fusion 360. Today, we'll create a simple yet powerful parametric box. This box will then be used on day 20 as we add 3D printable hinges. New to Fusion 360? This is a brand new 2023 version of Day #19 of "Learn Fusion 360 in 30 Days for Complete Beginners" - the most popular Fusion 360 course on the internet! Learn faster with Kevin's Fusion 360 Masterclass at https://ProductDesignOnline.com/courses Resource Page ➞ https://productdesignonline.com/d19 CHECKLIST FOR BEGINNERS ➞ http://bit.ly/f360checklist Full course on YouTube: https://bit.ly/30daysUpdated **Support our free tutorials** PayPal - https://paypal.com/paypalme/productdesignonline/30 Patreon - https://patreon.com/productdesignonline Say Thanks w/Coffee - https://buymeacoffee.com/pdo TIMESTAMPS 00:00 - User Parameters in Autodesk Fusion 360 Explained 00:11 - What are User Parameters in Fusion 360 00:32 - Create new User Parameters in Fusion 360 01:55 - Call User Parameters in Fusion 360 Sketch Dimensions 02:45 - Create Parameters on the Fly in Fusion 360 03:20 - Testing User Parameters in Fusion 360 04:21 - Copy and Paste New component in Fusion 360 05:14 - How to use the Joint command in Fusion 360 06:48 - Day 20 Next Lesson — Disclaimer: This video description may contain affiliate links, meaning I get a small commission if you decide to make a purchase through my links, at no cost to you. — #Fusion360 #ProductDesignOnline
Thumbnail
Design 3D Printable Hinges | Day 20 of Learn Fusion 360 in 30 Days - 2023 EDITION
342K views • over 2 years ago
Learn how to create 3D printable hinges on our parametric box from Day 19. These simple and easy-to-print hinges can be scaled and modified to adapt any 3D print design! We'll discuss designing with a clearance in mind, mirroring the hinges, and much more. New to Fusion 360? This is a brand new 2023 version of Day #20 of "Learn Fusion 360 in 30 Days for Complete Beginners" - the most popular Fusion 360 course online! Learn faster with Kevin's Fusion 360 Masterclass at https://ProductDesignOnline.com/courses Resource Page ➞ https://productdesignonline.com/d20 CHECKLIST FOR BEGINNERS ➞ http://bit.ly/f360checklist Full course on YouTube: https://bit.ly/30daysUpdated **Support our free tutorials** PayPal - https://paypal.com/paypalme/productdesignonline/30 Patreon - https://patreon.com/productdesignonline Say Thanks w/Coffee - https://buymeacoffee.com/pdo TIMESTAMPS 00:00 - 3D Printable Hinges in Autodesk Fusion 00:18 - Deleting the Joint and creating a new one 02:04 - Creating the hinge side profile 03:20 - Creating the hinge's inner hinge pin (nub) 04:15 - Creating the inner hinge 06:03 - Creating a clearance between the hinges 06:35 - Removing the hinge pin (nub) from the inner hinge 07:03 - Adding clearance to the inner hinge 07:47 - Mirroring the Hinge to the other side 08:45 - Exporting STL from Autodesk Fusion — Disclaimer: This video description may contain affiliate links, meaning I get a small commission if you decide to make a purchase through my links, at no cost to you. — #Fusion360 #ProductDesignOnline #fusion #3dprinting
Thumbnail
3D Printable One-Part Molds | Day 21 of Learn Fusion 360 in 30 Days - 2023 EDITION
106K views • over 2 years ago
Learn how to create one-part 3D printable molds in Autodesk Fusion. We'll discuss designing with a draft angle in mind, mirroring the hinges, and much more. New to Fusion 360? This is a brand new 2023 version of Day #21 of "Learn Fusion 360 in 30 Days for Complete Beginners" - the most popular Fusion 360 course online! Resource Page ➞ https://productdesignonline.com/d21 Full course on YouTube: https://bit.ly/30daysUpdated CHECKLIST FOR BEGINNERS ➞ http://bit.ly/f360checklist Learn faster with Kevin's Fusion 360 Masterclass at https://ProductDesignOnline.com/courses Day 22: https://youtu.be/Q1Thdrt40MA **Support our free tutorials** PayPal - https://paypal.com/paypalme/productdesignonline/30 Patreon - https://patreon.com/productdesignonline Say Thanks w/Coffee - https://buymeacoffee.com/pdo TIMESTAMPS 00:00 - 3D Printable One-Part Mold in Autodesk Fusion 00:25 - Creating the keychain body for the mold 01:03 - Adding a Hole for the keychain 02:10 - Adding text or a custom design to your keychain 03:00 - Creating a one-part mold component in Autodesk Fusion 04:00 - Using the Combine command to cut the mold body 04:35 - Adding a Draft to the mold in Autodesk Fusion 06:19 - Export design as STL in Autodesk Fusion — Disclaimer: This video description may contain affiliate links, meaning I get a small commission if you decide to make a purchase through my links, at no cost to you. — #Fusion360 #ProductDesignOnline #fusion #3dprinting
Thumbnail
Two-Part Molds in Autodesk Fusion 360 | Day 22 of Learn Fusion 360 in 30 Days - 2023 EDITION
126K views • over 2 years ago
Learn how to create two-part 3D printable molds in Autodesk Fusion. We'll discuss designing with parting lines, registration marks, clearances, and more. New to Fusion 360? This is a brand new 2023 version of Day #22 of "Learn Fusion 360 in 30 Days for Complete Beginners" - the most popular Fusion 360 course online! Resource Page ➞ https://productdesignonline.com/d22 Full course on YouTube: https://bit.ly/30daysUpdated CHECKLIST FOR BEGINNERS ➞ http://bit.ly/f360checklist Learn faster with Kevin's Fusion 360 Masterclass at https://ProductDesignOnline.com/courses SUPPORT KEVIN'S TUTORIALS Patreon ➞ https://patreon.com/productdesignonline Single Donation ➞ https://www.buymeacoffee.com/pdo TIMESTAMPS 00:00 - 3D Printable Two-Part Molds in Autodesk Fusion 2024 00:15 - What is a mold parting line? 00:48 - Adjusting the design to be on a symmetry line 02:17 - Creating the Mold Box component and 3D body 03:12 - Subtracting the chess pieces from the mold box 03:45 - Creating the parting line with the Split Body command 04:33 - Creating Registration Marks positive side 06:11 - Creating Registration Marks negative side 07:07 - Add clearance to the registration marks 07:50 - Adding chamfers to the outside edges 08:05 - Additional tips to consider when making two-part molds — Disclaimer: This video description may contain affiliate links, meaning I get a small commission if you decide to make a purchase through my links, at no cost to you. — #Fusion360 #ProductDesignOnline #fusion #3dprinting #autodesk
Thumbnail
Create Assemblies with Joints in Fusion 360 | Day 23 of Learn Fusion 360 in 30 Days - 2023 EDITION
79K views • over 2 years ago
Learn how to assemble designs in Autodesk Fusion. We'll discuss using the As-Built Joint command to create joints and motion with designs that are built in place, including imported designs. This demo uses the 06_tripod demo file included with your Autodesk Fusion install. New to Fusion 360? This is a brand new 2023 version of Day #23 of "Learn Fusion 360 in 30 Days for Complete Beginners" - the most popular Fusion 360 course online! Resource Page ➞ https://productdesignonline.com/d23 Full course on YouTube: https://bit.ly/30daysUpdated CHECKLIST FOR BEGINNERS ➞ http://bit.ly/f360checklist Learn faster with Kevin's Fusion 360 Masterclass at https://ProductDesignOnline.com/courses SUPPORT KEVIN'S TUTORIALS Donate $1 per lesson ➞ https://www.paypal.com/paypalme/productdesignonline/30 Patreon ➞ https://patreon.com/productdesignonline Single Donation ➞ https://www.buymeacoffee.com/pdo TIMESTAMPS 00:00 - Intro to Joints and Assemblies in Autodesk Fusion 00:15 - Open and Save the Tripod Demo file from the Data Panel 01:25 - Mates equivalent in Autodesk Fusion 360 01:43 - Common Assembly approaches in Autodesk Fusion 03:40 - Joints vs As-Built Joints in Autodesk Fusion 04:21 - Creating the first As-Built Joint on the tripod leg 05:36 - Defining Joint Motion Limits in Autodesk Fusion 06:45 - Joints with copied parts in Autodesk Fusion 08:06 - Adding the remaining Joints to the tripod legs and stand 10:44 - Creating a Ball Joint in Autodesk Fusion 360 11:23 - Testing your Joint motion in Autodesk Fusion — Disclaimer: This video description may contain affiliate links, meaning I get a small commission if you decide to make a purchase through my links, at no cost to you. — #Fusion360 #ProductDesignOnline #fusion #cad #autodesk
Thumbnail
Basics of Sheet Metal Tools in Fusion 360 | Day 24 of Learn Fusion 360 in 30 Days - 2023 EDITION
75K views • over 2 years ago
Join our Fusion Masterclass 👉 https://bit.ly/PDOMasterclass Height Datum and Bend Position info - https://productdesignonline.com/d24 Learn Fusion faster - https://bit.ly/PDOAcademy **Support our free tutorials** PayPal - https://paypal.com/paypalme/productdesignonline/30 Patreon - https://patreon.com/productdesignonline Say Thanks w/Coffee - https://buymeacoffee.com/pdo New to Fusion 360? This is a brand new 2023 version of Day #24 of "Learn Fusion 360 in 30 Days for Complete Beginners" - the most popular Fusion 360 course online! Learn how to design basic sheet metal goods in Autodesk Fusion. We'll discuss using the Flange tool, creating and updating Flat Patterns, sheet metal components, sheet metal rules, and so much more! I recommend both @fabworks and @sendcutsend for your sheet metal projects. ✅ Tools I recommend (some are affiliate links to support the channel!): **3D Printing** Bambu X1C - https://bit.ly/BambuX1C Bambu AMS - https://bit.ly/BambuAMS Bambu P1S - https://bit.ly/BambuP1S Bambu A1 Mini - https://bit.ly/BambuA1Min Bambu Filament - https://bit.ly/BambuPla TIMESTAMPS 00:00 - Intro to Autodesk Fusion Sheet Metal features 00:29 - Standard vs Sheet Metal Components in Autodesk Fusion 01:32 - Creating a sketch for the base flange in Autodesk Fusion 02:48 - Creating the side flanges for the napkin holder 03:27 - Height Datum and Bend Position in Autodesk Fusion 05:10 - Creating Full Round Fillets that are future-proof 06:03 - How to create a flat pattern in Autodesk Fusion 360 07:21 - Creating the inner slot detail 08:29 - Preparing the sheet metal part for powder-coating 09:16 - Creating a sheet metal rule in Autodesk Fusion 360 10:33 - Changing the thickness of the sheet metal part in Fusion 11:15 - Updating the flat pattern in Autodesk Fusion 11:27 - Exporting your sheet metal design in Autodesk Fusion — Disclaimer: This video description may contain affiliate links, meaning I get a small commission if you decide to make a purchase through my links, at no cost to you. — #Fusion360 #ProductDesignOnline #fusion #cad #autodesk #metal #sheetmetals
Thumbnail
Fusion 360 SURFACES made EASY | Day 25 of Learn Fusion 360 in 30 Days - 2024 EDITION
86K views • about 2 years ago
Join our updated Fusion Masterclass 👉 https://bit.ly/PDOMasterclass New to Autodesk Fusion 360? This is a brand new 2023-24 version of Day #25 of "Learn Fusion 360 in 30 Days for Complete Beginners" - the most popular Autodesk Fusion 360 course on the internet! Day 26: https://youtu.be/WtEWbNIaK9Q?si=-xSUqX2t63q8UIBB Full course (on YouTube): https://bit.ly/30daysUpdated **Support our free tutorials** PayPal - https://paypal.com/paypalme/productdesignonline/30 Patreon - https://patreon.com/productdesignonline Say Thanks w/Coffee - https://buymeacoffee.com/pdo **Tutorial Resources** 1. Resource page - https://ProductDesignOnline.com/d25 2. Checklist for Fusion beginners: http://bit.ly/f360checklist **Our Top Fusion Playlists** 30 Days Series (latest) - https://bit.ly/30DaysV2 Woodworkers - http://bit.ly/woodworker-playlist 3D Printing - http://bit.ly/3D-printing-playlist Sculpting - http://bit.ly/sculpt-playlist Products I recommend (some are affiliate links to support the channel!): **3D Printing** Bambu X1C - https://bit.ly/BambuX1C Bambu AMS - https://bit.ly/BambuAMS Bambu P1S - https://bit.ly/BambuP1S Bambu A1 Mini - https://bit.ly/BambuA1Min Bambu Filament - https://bit.ly/BambuPla SUBSCRIBE (& Hit the Bell!) http://bit.ly/sub-right-now Product Design Online links: ━━━━━━━━━━━━━ PDO Website: https://productdesignonline.com PDO Academy: https://bit.ly/PDOAcademy Fusion beginners PDF: http://bit.ly/f360checklist Fusion hotkeys PDF: https://bit.ly/F360Hotkeys 00:00 - Fusion 360 surface modeling tutorial 00:15 - Key surface modeling terminology 01:40 - Inserting and calibrating the propeller reference image 02:35 - Creating the propeller's hub 03:14 - Creating sketches for the surface loft 05:10 - Lofting with the surface loft tool 05:50 - Sketching the contour of the blade 06:23 - Surface extrude the blade 07:00 - Use Trim to trim away excess surfaces 07:33 - Adjusting the sketches to change the blade shape 08:14 - Testing that surfaces have no real volume 08:43 - Circular patterning the propeller blades 09:09 - Convert surfaces in to solid bodies with Thicken 09:44 - Combinging the final solid bodies 09:53 - Next Lesson Day 26 — Disclaimer: This video description may contain affiliate links, meaning I get a small commission if you decide to make a purchase through my links, at no cost to you. #Fusion360 #ProductDesignOnline #fusion #cad
Thumbnail
EASY ways to edit mesh files in Fusion 360 | Day 26 of Learn Fusion 360 in 30 Days - 2024 EDITION
154K views • almost 2 years ago
Master the correct techniques and accelerate your design skills today 👉 https://bit.ly/PDOMasterclass New to Autodesk Fusion 360? This is a brand new 2023-24 version of Day #26 of "Learn Fusion 360 in 30 Days for Complete Beginners" - the most popular Autodesk Fusion 360 course on the internet! Full course (on YouTube): https://bit.ly/30daysUpdated **Support our free tutorials** PayPal - https://paypal.com/paypalme/productdesignonline/30 Patreon - https://patreon.com/productdesignonline Say Thanks w/Coffee - https://buymeacoffee.com/pdo **Tutorial Resources** 1. Resource page - https://ProductDesignOnline.com/d26 2. Checklist for Fusion beginners: http://bit.ly/f360checklist **Our Top Fusion Playlists** 30 Days Series (latest) - https://bit.ly/30DaysV2 Woodworkers - http://bit.ly/woodworker-playlist 3D Printing - http://bit.ly/3D-printing-playlist Sculpting - http://bit.ly/sculpt-playlist Products I recommend (some are affiliate links to support the channel!): **3D Printing** Bambu X1C - https://bit.ly/BambuX1C Bambu AMS - https://bit.ly/BambuAMS Bambu P1S - https://bit.ly/BambuP1S Bambu A1 Mini - https://bit.ly/BambuA1Min Bambu Filament - https://bit.ly/BambuPla SUBSCRIBE (& Hit the Bell!) http://bit.ly/sub-right-now Product Design Online links: ━━━━━━━━━━━━━ PDO Website: https://productdesignonline.com PDO Academy: https://bit.ly/PDOAcademy Fusion beginners PDF: http://bit.ly/f360checklist Fusion hotkeys PDF: https://bit.ly/F360Hotkeys 00:00 - Fusion 360 mesh tools explained 00:22 - Adjust the size of the mesh parts 01:10 - Bonus tip: how to measure mesh bodies in Fusion 360 02:03 - Bonus tip: expand construction plane edges 02:21 - Create Mesh Section Sketch explained in Fusion 360 03:22 - Fit Curves to Mesh Section explained in Fusion 360 06:32 - Tesselate bodies in Autodesk Fusion 360 08:15 - Add or subtract text from a mesh body in Fusion 360 09:27 - Next video: Day 27 — Disclaimer: This video description may contain affiliate links, meaning I get a small commission if you decide to make a purchase through my links, at no cost to you. #Fusion360 #ProductDesignOnline #fusion #cad #autodesk
Thumbnail
Fusion T-splines are easy! | Day 27 of Learn Fusion 360 in 30 Days - 2024 EDITION
177K views • almost 2 years ago
Learn Fusion assemblies with our Masterclass 👉 https://bit.ly/PDOMasterclass New to Autodesk Fusion 360? This is a brand new 2023-24 version of Day #27 of "Learn Fusion 360 in 30 Days for Complete Beginners" - the most popular Autodesk Fusion 360 course on the internet! Full course (on YouTube): https://bit.ly/30daysUpdated Products I recommend (some are affiliate links to support the channel!): **3D Printing** Bambu X1C - https://bit.ly/BambuX1C Bambu AMS - https://bit.ly/BambuAMS Bambu P1S - https://bit.ly/BambuP1S Bambu A1 Mini - https://bit.ly/BambuA1Min Bambu Filament - https://bit.ly/BambuPla **Support our free tutorials** PayPal - https://paypal.com/paypalme/productdesignonline/30 Patreon - https://patreon.com/productdesignonline Say Thanks w/Coffee - https://buymeacoffee.com/pdo **Tutorial Resources** 1. Resource page (demo file) - https://ProductDesignOnline.com/d27 2. Checklist for Fusion beginners: http://bit.ly/f360checklist **Our Top Fusion Playlists** 30 Days Series (latest) - https://bit.ly/30DaysV2 Woodworkers - http://bit.ly/woodworker-playlist 3D Printing - http://bit.ly/3D-printing-playlist Sculpting - http://bit.ly/sculpt-playlist SUBSCRIBE (& Hit the Bell!) http://bit.ly/sub-right-now Product Design Online links: ━━━━━━━━━━━━━ PDO Website: https://productdesignonline.com PDO Academy: https://bit.ly/PDOAcademy Fusion beginners PDF: http://bit.ly/f360checklist Fusion hotkeys PDF: https://bit.ly/F360Hotkeys 00:00 - Fusion 360 T-splines tutorial for beginners 00:20 - Fusion 360 form environment explained 00:41 - Creating the first t-spline vase in Fusion 360 01:21 - T-spline basics in Fusion 360 02:07 - Edit Form in Fusion 360 T-splines 03:41 - Extruding faces in Fusion 360 T-splines 04:45 - Creating the second t-spline vase in Fusion 360 05:30 - Symmetry with Fusion 360 t-splines 05:50 - Insert edge in Fusion 360 06:54 - Changing the pull direction in T-splines 07:26 - Twisting the t-spline model in Fusion 360 08:33 - Making the top and bottom surfaces flat 09:40 - 2 ways to turn T-splines into Solid bodies 10:50 - Turn on vase mode in Bambu Studio 11:17 - Next video: Day 28 — Disclaimer: This video description may contain affiliate links, meaning I get a small commission if you decide to make a purchase through my links, at no cost to you. #Fusion360 #ProductDesignOnline #fusion #cad #autodesk
Thumbnail
Fusion 360 Rendering - Quick Start Guide | Day 28 of Learn Fusion 360 in 30 Days - 2024 EDITION
74K views • almost 2 years ago
Learn how to render your woodworking projects in our Fusion Masterclass for woodworkers: https://bit.ly/PDOMasterclass New to Autodesk Fusion 360? This is a brand new 2023-24 version of Day #28 of "Learn Fusion 360 in 30 Days for Complete Beginners" - the most popular Autodesk Fusion 360 course on the internet! Full course (on YouTube): https://bit.ly/30daysUpdated Products I recommend (some are affiliate links to support the channel!): **3D Printing** Bambu X1C - https://bit.ly/BambuX1C Bambu AMS - https://bit.ly/BambuAMS Bambu P1S - https://bit.ly/BambuP1S Bambu A1 Mini - https://bit.ly/BambuA1Min Bambu Filament - https://bit.ly/BambuPla **Support our free tutorials** PayPal - https://paypal.com/paypalme/productdesignonline/30 Patreon - https://patreon.com/productdesignonline Say Thanks w/Coffee - https://buymeacoffee.com/pdo **Tutorial Resources** 1. Resource page (demo file and decal) - https://ProductDesignOnline.com/d28 2. Checklist for Fusion beginners: http://bit.ly/f360checklist **Our Top Fusion Playlists** 30 Days Series (latest) - https://bit.ly/30DaysV2 Woodworkers - http://bit.ly/woodworker-playlist 3D Printing - http://bit.ly/3D-printing-playlist Sculpting - http://bit.ly/sculpt-playlist SUBSCRIBE (& Hit the Bell!) http://bit.ly/sub-right-now Product Design Online links: ━━━━━━━━━━━━━ PDO Website: https://productdesignonline.com PDO Academy: https://bit.ly/PDOAcademy Fusion beginners PDF: http://bit.ly/f360checklist Fusion hotkeys PDF: https://bit.ly/F360Hotkeys 00:00 - Photorealistic rendering in Autodesk Fusion 360 00:22 - Enter Fusion 360's Render Workspace 00:37 - Start by applying Appearances in Fusion 360 02:49 - In-canvas Render in Fusion 360 explained 03:34 - Fusion 360 render scene settings explained 04:45 - Environment Library in Fusion 360's Render Workspace 05:23 - A trick to make your render twice as good! 05:43 - Adding a decal to a Fusion 360 rendering 06:27 - Texture map controls in Fusion 360 06:48 - Submit your first render! 07:00 - Cloud vs local rendering in Fusion 360 08:46 - Render results in Fusion 360 09:07 - Next video: Day 29 — Disclaimer: This video description may contain affiliate links, meaning I get a small commission if you decide to make a purchase through my links, at no cost to you. #Fusion360 #ProductDesignOnline #fusion #cad #autodesk
Thumbnail
Easy 2D Drawings in Fusion 360 | Day 29 of Learn Fusion 360 in 30 Days - 2024 EDITION
59K views • almost 2 years ago
Learn how to create Parts Lists for your woodworking projects in our Fusion Masterclass for woodworkers: https://bit.ly/PDOMasterclass New to Autodesk Fusion 360? This is a brand new 2023-24 version of Day #29 of "Learn Fusion 360 in 30 Days for Complete Beginners" - the most popular Autodesk Fusion 360 course on the internet! Full course (on YouTube): https://bit.ly/30daysUpdated Products I recommend (some are affiliate links to support the channel!): **3D Printing** Bambu X1C - https://bit.ly/BambuX1C Bambu AMS - https://bit.ly/BambuAMS Bambu P1S - https://bit.ly/BambuP1S Bambu A1 Mini - https://bit.ly/BambuA1Min Bambu Filament - https://bit.ly/BambuPla **Support our free tutorials** PayPal - https://paypal.com/paypalme/productdesignonline/30 Patreon - https://patreon.com/productdesignonline Say Thanks w/Coffee - https://buymeacoffee.com/pdo **Tutorial Resources** 1. Resource page (demo file and decal) - https://ProductDesignOnline.com/d29 2. Checklist for Fusion beginners: http://bit.ly/f360checklist **Our Top Fusion Playlists** 30 Days Series (latest) - https://bit.ly/30DaysV2 Woodworkers - http://bit.ly/woodworker-playlist 3D Printing - http://bit.ly/3D-printing-playlist Sculpting - http://bit.ly/sculpt-playlist SUBSCRIBE (& Hit the Bell!) http://bit.ly/sub-right-now Product Design Online links: ━━━━━━━━━━━━━ PDO Website: https://productdesignonline.com PDO Academy: https://bit.ly/PDOAcademy Fusion beginners PDF: http://bit.ly/f360checklist Fusion hotkeys PDF: https://bit.ly/F360Hotkeys 00:00 - Fusion 360 Drawing Workspace tutorial 00:33 - How to create a new 2D Drawing in Fusion 360 02:04 - Place drawing Base View in Fusion 360 02:37 - How to reposition drawing views in Autodesk Fusion 02:58 - Create Projected Views in Autodesk Fusion 360 03:44 - Edit view properties in the Drawing workspace 04:29 - Reposition orthographic views in Fusion 360 drawing 04:58 - Create additional drawing sheets in Fusion 360 05:33 - Sketching in Fusion 360’s Drawing Workspace 06:10 - How to use Fusion 360’s Dimension tool 07:40 - How to delete dimensions in Fusion’s Drawing workspace 08:07 - Detail view in Autodesk Fusion 360 08:44 - Radius Dimension tool in Autodesk Fusion 09:15 - Title block in Autodesk Fusion 360 10:17 - Export a 2D Drawing from Autodesk Fusion 360 10:37 - Drawing Automation in Autodesk Fusion 360 explained 11:40 - Next video: Day 30 — Disclaimer: This video description may contain affiliate links, meaning I get a small commission if you decide to make a purchase through my links, at no cost to you. #Fusion360 #ProductDesignOnline #fusion #cad #autodesk
Thumbnail
Getting Started Creating ANIMATIONS in Fusion 360 - Beginners Start Here!
80K views • over 1 year ago
Congratulations on reaching Day 30! If you've gained valuable skills or learned something new along the way, please consider supporting the channel with a donation. Each lesson takes around 12 hours to produce, and your contribution will help me continue dedicating time to create more free content. Every bit helps keep these resources accessible to everyone—thank you for your support! PayPal - https://paypal.com/paypalme/productdesignonline/30 Patreon - https://patreon.com/productdesignonline Say Thanks w/Coffee - https://buymeacoffee.com/pdo Demo File - https://ProductDesignOnline.com/d30 Ready to take your Fusion skills to the next level? Learn with our Fusion Masterclass: https://bit.ly/PDOMasterclass Products I recommend (some are affiliate links to support the channel!): **3D Printing** Bambu X1C - https://bit.ly/BambuX1C Bambu AMS - https://bit.ly/BambuAMS Bambu P1S - https://bit.ly/BambuP1S Bambu A1 Mini - https://bit.ly/BambuA1Min Bambu Filament - https://bit.ly/BambuPla **Our Top Fusion Playlists** 30 Days Series (latest) - https://bit.ly/30DaysV2 Woodworkers - http://bit.ly/woodworker-playlist 3D Printing - http://bit.ly/3D-printing-playlist Sculpting - http://bit.ly/sculpt-playlist SUBSCRIBE (& Hit the Bell!) http://bit.ly/sub-right-now Product Design Online links: ━━━━━━━━━━━━━ PDO Website: https://productdesignonline.com PDO Academy: https://bit.ly/PDOAcademy Fusion beginners PDF: http://bit.ly/f360checklist Fusion hotkeys PDF: https://bit.ly/F360Hotkeys 00:00 - Fusion 360 Animation Workspace for beginners 00:28 - Components are required for animations 00:46 - Animation workspace overview in Fusion 360 01:32 - Playhead and scratch zone explained 01:50 - Create exploded views in Autodesk Fusion 02:45 - How to reverse animations in Fusion 360 03:10 - Copy Storyboards in Fusion 360 Animation workspace 03:35 - Edit individual actions in the animation timeline 04:23 - How to record View Actions in Fusion 360 04:47 - Create new Storyboards in Fusion 360 Animation workspace 05:16 - Transform Components in Fusion 360 Animation 06:32 - Restore Home and Animation Tips in Autodesk Fusion 08:45 - How to publish Animations in Autodesk Fusion 360 — Disclaimer: This video description may contain affiliate links, meaning I get a small commission if you decide to make a purchase through my links, at no cost to you. #Fusion360 #ProductDesignOnline #fusion #cad #autodesk